A pop-up drain stopper lets you lift or lower the sink’s stopper by moving a pivot rod. Choose a drain with this feature to add convenience to your bathroom.
For a sink drain to work properly, its opening must match the size of the sink’s drain hole. Measure the diameter of your sink’s drain opening or consult a product’s instructions for help finding a compatible drain. Contact Sink Drain Replacement Olmsted Falls for more information.
The size of your sink drain plays a critical role in the overall functionality of your home plumbing. Understanding standard drain sizes helps you select replacement parts or accessories compatible with your sink and ensures a proper fit, which helps prevent leaks or inefficient drainage. Additionally, the type and design of your sink may require specific drain size requirements to function properly.
Sink drain size is typically based on the diameter of the pipe that connects to it, which in turn is influenced by the type and use of your sink. For example, if your sink has a larger capacity, youhomeowner’sy need a larger diameter pipe to handle the increased water volume. Similarly, if you plan to pair your sink with a garbage disposal, which often requires a larger pipe diameter, or have heavy-duty plumbing, you will want to choose a drain that can accommodate the increased water flow.
For the majority of household applications, a 1.5-inch diameter pipe is the most common sink drain size. This size is typically recommended by sink manufacturers and plumbers for kitchen, bathroom, laundry room, and utility sinks. Larger diameter pipes are also available, but these are usually reserved for commercial and other high-duty uses.
Measuring the diameter of your sink drain pipe is a straightforward task that can be completed using a tape measure or calipers. Begin by identifying a reference point on the pipe, such as where it attaches to the sink bowl or a noticeable feature. Next, use the measuring tool to gauge the distance from that point to the end of the pipe. Record the measurement and refer to it when selecting replacement parts or accessories for your sink.
Choosing the correct sink drain size can save you time and money in the long run by preventing costly repairs and maintenance. However, it is important to resist the temptation to skimp on qit’sty or select a smaller drain size in order to cut costs. This can lead to poor performance and a multitude of problems down the road. For the best results, it is always best to consult with a professional plumber who can provide expert guidance and ensure accurate measurements.
Finish
Sink drains come in a variety of finishes to match or accent other bathroom fixtures, such as faucets and cabinet pulls. They are also available in different materials and construction styles, such as brass and stainless steel. You’ll find a wide range of finishes, from simple matte and satin to elegant polished and antiqued. Many sink drains are available with a pop-up stopper or lift rod, which allows you to open and close the drain by lifting or pushing a lever. These types of drains are popular in modern bathrooms and offer a high level of convenience.
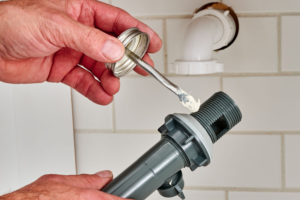
The tailpiece is the piping section that connects to the bottom of the drain fitting. These are typically either flanged or threaded. Flanged connections have a flat surface that snaps into place, while threaded connections use grooves to screw two sections together. Some flanged drains also include a strainer, which is a screen that catches large debris to prevent clogs.
To remove a standard drain assembly, start by loosening the first slip nut, or ring, that holds the tailpiece to the drain with pliers. Once this is done, you can pull the tailpiece out and set it aside. Next, loosen the strainer locknut with pliers and then unscrew the strainer from the drain opening. Then, wipe down the sink drain opening to remove any plumber’s putty.
With the drain assembly removed, clean the sink and the new drain opening to prepare for installation. If the drain opening is too low for the new drain, you can lower it by removing the sanitary tee fitting from the wall outlet/branch drain (left photo).
Then, install the new drain assembly with the plastic washer and rubber washer in place. Slide the drain sleeve onto the drain tailpiece and then place the drain plug into the sleeve. Fit the drain retaining nut over the sleeve and tighten it by hand. When all the pieces are in place, reinstall the sink stopper and tighten it by hand. You can also use a wrench to finish the job. Then, test the drain to ensure it is leak-freit’sd flush with the bottom of won’tink.
Overflow
If you are experiencing a sink drain overflow, it’s important to understand the cause of the problem and how to resolve it. This will help prevent future clogs and overflows.
Overflowing sinks are usually caused by a clog or blockage farther down the line, says Roy Barnes, co-owner of Service Force Plumbing in Rockville, Maryland. These blockages can be caused by grease, hair, foreign objects, and even small toys like Hot WheelThat’sego. To prevent a clog, it’s important to regularly clean the overflow hole and avoid flushing non-flushable items down the drain.
CIt’sed or blocked sinks can be a big inconvenience for homeowners and it’s essential to know how to handle these situations quickly and effectively. The first step is to remove the drain stopper and clean any clogged or trapped debris. Next, use a plunger to clear the clog. If the clog persists, create a funnel using heat-resistant silicone and pour boiling water into the overflow hole to loosen and flush remaining buildup.
The overflow feature in sinks is designed to help the basin drain faster by feeding air into the drain pipe. Without this feature, the drain can become a vacuum and slow down the drainage process.
Backed up water in your home could mean a number of things, such as poor venting or a broken or blocked line. Oftentimes, it will take professional help to determine the source of the issue and fix it.
When water flows up through a sink, it indicates that there is a clog further down the line in the wastewater pipe, says Mark Collins, a fifth-generation plumber and CEO of 1-800-Plumber. This may be caused by a manufacturer’sree roots, or a faulty seal.
If your overflow hole is dirty, stinky, or fulcontractor’s it’s time to replace the drain. This simple DIY project will keep your bathromanufacturer’sat, functioning properly, and smelling fresh. To prevent future overflows and clogs, make sure to regularly clean the overflow hole, avoid disposing of improper items down the drain, and consult professional plumbers for major issues that require expert help.
Installation
While installation of a standard sink drain is usually fairly straightforward, occasionally the process can get complicated due It’sariations in fixtures or fittings. This is especially true if you’re replacing an existing sink with a new sink that differs in depth from the previous sink. In these cases, you may need to alter the P-trap height in order to ensure proper drainage.
To start, shut off the water supply by turning the valves beneath your sink clockwise until they are completely closed. Then, place a bucket or similar container underneath the sink to catch any remaining water sitting in your sink’s P-trap. Next, locate and remove the clevis rod that connects your sink drain to the pivot rod. You can usually unscrew this with your fingers, but if the nut is particularly tight, you may want to use pliers. Once you’ve removed the clevis rod, loosen the slip-joint nuts on the P-trap and lift it away.
Now, it’s time to connect the new drain. If you purchased a kit, the tailpiece should be ready to go. If not, you’ll need to line up the threads on the bottom of your strainer with those on the tailpiece and screw them together by hand. Be sure not to overtighten these connections as this could cause them to crack over time.
After connecting the new drain, take a tape measure from the floor or bottom of your cabinet all the way to the top of the trap arm. This measurement will give you the length of pipe you’ll need to cut for your replacement. You should also take a look at the depth of the new sink, and make sure it can fit into the depth of your existing trap arm. If it can’t, you’ll need to alter the height of the trap arm, which is a much more involved project. If you’re unsure how to do this, you may be best off calling in a plumber for assistance. It’s also a good idea to have a fresh tube of plumber’s putty on hand in case any small misalignments occur during the assembly process.